Pages

Pinterest

Showing posts with label Card. Show all posts

July 20, 2021

You & Me - Pretty Little Studio

Meet me over on the Pretty Little Studio Blog today!

You & Me, drinking coffee in the shape of hearts, on a beautiful purple background!
Wouldn't this be a cute "let's meet up for coffee soon" card for your best chum?

I started with a 5x5 card base.  Then I chose 2 perfectly matched purple Oxide inks and blended my background and added water droplets.   From the Grateful Hearts Collection, I used a frame from the My Favorite Die Cuts.  Tucked in a Tag cut from the Snapshots Cut Apart 12x12.   A few more ephemera pieces and lots of foam tape and my coffee invite was almost done.  
I wanted to emphasize the hearts in the coffee so I used Nuvo Drops to accent those.
I added little water droplet bling and that is it!  


May 6, 2021

Guest Designing for Whimsy Stamps!

 Good morning friends!
I was so excited to be asked to Guest Design for Whimsy Stamps
They told me to order a couple things and that was the hardest thing evah!!!


I did choose a couple things.  One, the cutest thing, will be shared here on the 13th.  
OMG. You WILL NEED it.  But, for todays post, I chose classic, reusable items.  Items that will go far in my stash as a scrapbooker and card maker.  

I chose the Bold ABC Dies Set and the Checkerboard Die.  The alphas can be used in so many ways.  I don't see them being too far out of reach for future projects.  The Checkerboard Die is a great background for any occasion.  You will see below how easy it is to change it for your needs.  

I think the best part about the Checkerboard Dies is the automatic confetti that is produced.  I think adding them to the inside of the card so when the recipient opens them, they fall all over is a grand idea!!  An extra surprise.  They may not like the clean up, but I would love the reaction!

Here are my cards that I created for todays blog post.  I hope you are inspired to grab them for yourself.  Just click on the links and you will be directed to the proper items.  


August 24, 2020

Beach Bound - Queen & Company

 Hey there.
Just take a look at the new Beach Bound Kit from Queen and Company.  
I love it so much.  I created the layout during a FB live over HERE.  Then I created this card during a different live, HERE.  I have decided that I will NEVER create with Queen again without the Outline Dies.  They made making the shakers so much easier.   Almost every collection is being created with a new matching Solid 6x6 Paper pad.  The one to match the Beach Bound kit is gorgeous. 

If you want to shop anything Queen & Co., here is the link, HERE.  It is an affiliate link so it does not cost you anything extra.  It gives me a little reward if you choose to shop through my link.  Thank you so much.  


July 15, 2019

Sunshine Cards - Elle's Studio

Morning Elle's fans!

Man, do I love making cards.  Especially with the goodies from the Elle's Studio Kits each month. I make several to mail with my left overs.  But this month, I received making cards as my assignment!  I adore mixing colors and creating layers with different patterns of papers.  

Here are the two cards that I created.  Both from the SAME July kit but completely DIFFERENT!  

Each month, Elle's Studio also offers additional items that are released each month.  


October 11, 2018

Spider Fest - Queen & Co.

Good morning!
If you can read this then you are Blissfully UNAWARE of what is CREEPING UP behind you!  It could be a spider.  It could be a spider created with Lollies and Epoxy Dots.  If it is, you are lucky!  This Fright Fest Halloween Shaker  from Queen & Co., is so fun and creepy.  
A colorful background makes the black web and its tiny spiders pop off the page!  I used a mixture of toppings to include the ones included in kit.  I used a ruler to create the web that extends directly to my Epoxy Dot spiders.


For my second card, I wanted to create something girly with the web.  Using girl colors, pink and purple Toppings and Pom Poms, it is perfect for the the girl that loves Halloween.

I created my own spiders for this fun card too.  I used Bubbles and Pom Poms with a coordinating colored pen for the legs.  
Go grab the Fright Fest Halloween Kit.  Create your cards with ease, since everything is included in your kit.  Or you could add a few additional items like I did.  

October 6, 2018

WCMD Blog Hop with Technique Tuesday!


WCMD you ask?
It is World Card Making Day and I am playing along with a fun Blog Hop with Technique Tuesday.

Technique Tuesday will be giving away an incredible stamp set called...
"YOU'RE OWLSOME" to anyone who purchases $30 in product.  
To receive this fun gift, use coupon code: WCMD18.


For the hop toady, I worked with the Happy Thanksgiving Stamp Set 
that will be shipping 10/15/18.


Technique Tuesday is also giving away a gift certificate to a lucky winner that participates in the hop.
So, what you need to do is, stop by each blog on the hop and comment.  
This will enter you in the drawing for a prize!
Comments will be taken from now until October 8th, 2018.
The winner will be announced on the Technique Tuesday Blog on October 10th.
 

October 1, 2018

Holiday Cards - Queen & Co.

Hey there!
Welcome to October!  We wanted to start this month off with a twisted view of Queen & Co.'s,  Window Shaped Shaker Set.  I am here to share two cards that I created with the Window Kit and I really thought outside of the box for these!  Is it Halloween already, or winter? Nope, not yet!  Just wanted to get you inspired to think ahead for your holiday cards.
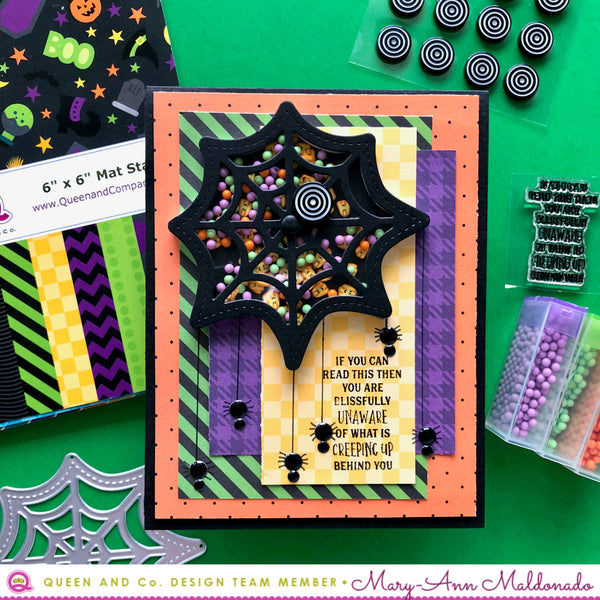
For my first card, I turned one of the window panes into a tombstone!  It did not take much effort, other than trimming out the panes of glass to have a clear view, and added my own typed sentiment inside two of the windows.  
After I completed my Tombstones, I recut them in black to create a shadow, to make things spookier!  The thread you see is meant to mimic spiderwebs.  
I filled my center tombstone with lots of Toppings.  Some that came with the kit and lots of Pops Toppings.
It was really fun to mix all the colors to create a fun shaker.

For my second card, I went more wintery.  I used just white and red and splattered paint on the entire card to replicate snow.  The placement of Starbursts, which look a lot like Pinwheels, also help convey the snowy theme.  
I thought it would be fun to use vellum for my glass, to get the fogged window look and added white Iridescent Bubble Toppings to replicate snow that has formed between the panes of glass.  If you come from New England, you know exactly what I am talking about!
I hope you will dig out your Windows Shaped Shaker Kit and think about the upcoming holidays or occasions.  They can literally be used for anything!  
Have Fun!
Mary-Ann

August 13, 2018

Bug Jar Kit - Queen and Company

Good morning Q&C friends.
Mary-Ann here!  I was so excited to receive the Bug Jar Kit in the mail from Queen and Company.  I have so many ideas!  It perfectly coordinates with the Love Jar Kit, it just adds additional embellishments for it.  I had to do something with the black and yellow bees!  Wouldn't you?  
I started with base colors that would match my tiny bee ToppIngs.  I decorated with a few bees and lightly filled the jar with coordinating Toppings.  

For my second card, I stared with wanting to create a blanket for a picnic but it turned into this instead!  It looks like my jar fell over, releasing all of the beautiful ladybugs.  
The clouds are from the Nested Cloud Dies.  To cover my glue dots from the vellum, I carefully placed Starbursts and Epoxy Dots.  
Thank you for stopping in today.  Hope you are having as much fun with these two kits as we all are!
Mary-Ann Maldonado
Bug Jar KitLove Jar KitEpoxy Dots
Starbursts
Nested Clouds
Paper Pads:  Delightful Dots, Halloween Hoopla, Heart Throb, Stripes
Pop Toppings
Bubble Toppings
Yellow Twine

July 21, 2018

You are Amazing - Stamps of Life

I recently played around with some fun products from 
I adore their papers!  Plus, they have sent me embellishments, stamps and dies.  
You must go check them out.  
There are lots of fun things and what I have here is only a small portion.  


SaveSave

July 13, 2018

Shaker Cards - Queen and Company

Good morning Q&C fans!
I have two new shaker cards for ya!  I gotta tell you it is really fun to be given a die set and told go to town!  There is so much versatilely to these sets.  No rules, just plain creativity.  I was assigned the Circle Shaped Shaker Set.  The set includes dies and the coordinating Foam Shapes.  9 foam shapes to be exact and 3 different size circle dies.  The Stamp Set that is included has several different themes.  Making playing with this set, super easy and fun. 
I decided to create a card based in the stamp sentiment: Something for the happy couple.  I looked through my older die/stamp stash for something I could make two of, representing the happy couple.  I found this fun Flamingo that came with a palm tree.   
After layering the papers and creating the shaker, I filled it with coordinating Jewel and Pop Toppings, Iridescent Toppings and Pearlies.  Adding a few stationary Metallic Bubbles in gold.

Supplies used:
Heart Throb Kit
Picture Perfect 6x6 pad
Metallic Bubbles - Gold
Circle Shaped Shaker
Toppings: Pops, Iridescent Bubbles, Pearlies and Jewels.
_____________________________________________________________

For my second card, I wanted to incorporate the Sunburst Die with the Circle Shaped Shaker.  I first blended my base paper with a few colors representing the sun.  After cutting out the Sunburst Die, I layered the Circle die on the Sunburst and re-cut with my Big Shot.  Leaving a Circle background, showing the pretty blended colors.  
I filled the Circle with various Confetti Toppings and Iridescent Bubbles.  Tied a yellow Sparkle String bow and that was all!
Supplies used:
Circle Shaped Shaker
Sparkle String - Yellow
Sunburst Die
Toppings: Confetti, Iridescent Bubbles, Tiny Bubbles
Thank you for popping in today.  I hope you are inspired to use other dies along with your newer ones.  It is a fun technique.

Mary-Ann Maldonado

June 12, 2018

Graduation and Rainbows - Queen & Co.

Join me on the Queen and Company blog today. 
My assignment was to highlight Metallic Bubbles and Cord.   
There are so many new embellishments in the shop, that you have to see!
Go HERE.


For my first card, I started with the Foam Front Die - Polka Dots.  I filled the circles with Toppings: Bubbles and Metallic to match my Metallic Bubbles that filled some of the holes.
I tiny sliver of yellow washi for pop and blue Cord and a Paper Smooches sentiment for the graduate.


For my second card, I layered rainbow papers and then the new Cord in a rainbow pattern.  I used the heart and love sentiment from the Heart Throb Shaker kit.   I literally only used one piece of paper for this card.  Its the rainbow sheet from the Fruit Basket 6x6 paper Pad


Thank you for stopping by.  Head to the Queen and Company website to see all the new embellishments that are added often.  They are inexpensive and can add so much interest to your next project.