Pages

November 26, 2013

Thankful


There are so many reasons to be thankful.  I just wanted to focus on the "food" in this layout.  To give you a run-down, my favorite part of any holiday meal is the Pinapple Orange Salad.  It is my step-grandmother's (Avis) recipe.  Before she passed, she gave me the crystal dish that she used to serve it in.  To this day, for every holiday, I make this salad and only use this dish.  
Something else you may not know about me, or maybe you do, I am a dish horder.  See the red depression dishes in the picture, they come from a lady down the street that was trashing them.  Trashing them!!!  The beautiful blue dish holding the smashed taters, that comes from Spain.  So peeps, I am thankful for food, dishes, a house to hoard it all in, a husband who doesn't care, family, friends and a hobby that allows me to express my graditude any way I want!

IMG_1800

IMG_1801

IMG_1802


What are you thankful for?  Be sure to scrap about it!  
Mary-Ann

Flair used in this layout:  
Il_570xN.500104532_hnqh


Il_570xN.470093513_t64f

November 24, 2013

Studio Calico

Guess who is being featured over at Studio Calico today for the Sunday Sketch Challenge?  Guess!!!
It's ME!!  I am so thrilled and have not been able to share this news until now.  I am not a secret keeper!   But I did it!  Last week I got an email to ask if I was interested....... ummmmm, let me think about that.  I held my breath and tried not to respond too quickly.  Didn't want them to think I was too eager!  Set the timer and then emailed back!  Got the details that afternoon and had to keep a secret for 6 days!  
6  DAYS!!!

This is how it works.....Studio Calico puts a sketch up on their blog Sunday with inspiration ideas (this time from me!)  They ask their followers to create and upload their interpretation of the sketch.  They will see the sketch, my designs and then make their own! Fun right?  Well, here are the sketches and what I did.  Go ahead and play along too!  You can upload your ideas to their site.

This was the scrapbooking layout sketch.


I create this 5 x 5 Live Your Life card.  It is loosely based on the layout sketch.  Instead of squares, I repeated circles and used the square grid background.  I trimmed out the circle from its original square, sewed to attach my vellum and used foam tape for dimension.  It was created using the Cuppa Kit and Chai add-on kit from Studio Calico.


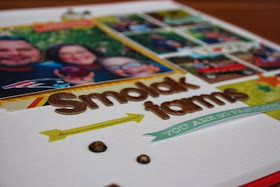
Using the same sketch, I created this Smolak Farms layout, using Cuppa and Chai add on, SC Opaque Gems and Woodgrain thickers.  I turned this sketch to the side.  This card sketch is PERFECT for a layout.  It helps you cram lots of favorite pictures from an event on one page.  My small squares are 2x2's, large enough to see clearly and leaves me plenty of room for embellishments.  I had to use the apple paperclips from the Chai add-on!!  My acetate was trimmed down to the same size as my small photos and attached by sewing.


Here is the Card sketch.


I used the card sketch for a layout, My True North! It was created using Cuppa, Double Scoop and SC Opaque gems.  I chose to slice some of the existing lines of the paper with my x-acto knife and ruler, I then backed this side with the remaining gray paper, used my fingernail to lift the edges and sewed around some of the circles  within the existing paper design.  I randomly placed SC opaque gems, layered papers, tags and blocks behind the photo to highlight.  My vellum was again attached by sewing.  It is very similar to the sketch but completely different at the same time.  I let the existing paper be the star (no pun intended.) It is perfectly fitting for anything that is the center of your world!


I hope that you have been inspired by the sketches or my take on them.  I do have tons of fun playing along with the Studio Calico kit monthly!


Thanks for stopping by.
Mary-Ann


November 23, 2013

Lunch with Tea Gram

Lunch with my mom is always a treat.  Whatever Roman wants, Roman gets!  The problem with this day, where we went was full of pastries and pies!  I loved this picture of the two of them.  You can almost see the almost, but not quite all the way there, cheesy smile from Roman.  Its hard to get a good picture of my mom too, she is always talking to the person with the camera in her face.  I guess not all of us can be models:o)  I get anxious too.  Oh well.

They both look like models here....


I am very Thankful for these two people and for such pretty paper:o)


This is when my pen leaked all over my page.  I made my dots larger and added a few more.  Can you tell?


This layout was created using the most beautiful paper line from Crate Paper.  Even a good looking boy can sport pink!

TFL,
Mary-Ann


November 18, 2013

Holly Jolly Christmas


I am over at The Rubber Cafe with my third card as a guest designer.  I love the typical Christmas colors and multiple patterns I chose to put together here.  With a tad of stitching and foam tape for dimension, this card "pops!"  


 The snowflakes needed something, and the ribbon included in the kit was a little too wide for what I had in mind so I made my own twine from the ribbon.  


I carefully sliced up both sides of the red and green ribbon, tied them together into a bow and attached to the center of my snowflakes.


I also used this same technique as an anchor for my ornament banner that I have sweeping across my card.


So, now I am three cards down out of 75!  I need to get busy!  I hope that you have been inspired to mix and match papers, color stamped images and alter ribbons to your specific needs!  
Until next time....

Mary-Ann

November 14, 2013

Plotting Their Day


On Veteran's Day, my boys decided to hit the parade.  They came back, congregated on my steps and plotted their next move.  I captured the photo of the plotting, and managed to scrap it all in the same day!  Never have I ever been so efficient!  I am pretty proud of myself.  They, however, did boy things! Laser Craze, Army surplus store, and Toys R Us.  Returning only to fuel their tanks.  They had boy movie plans but I crashed that!

I wanted to use the repeating circles as my theme throughout this layout.  I love the  photo and wanted it to be get the attention so I decided on pastel, white washed papers from Fancy Pants - Collecting Moments line all from eclectic Paperie.  This line could be used in SO many ways.  There is a dark rich blue that is calling my name!  Of course, flair from A Flair For Buttons is round!!


Thanks for stopping by my blog.  It is never to late to thank a veteran,  I thanked mine this morning.  

Here he is on retirement day... June of 2008.


Mary-Ann


November 11, 2013

Sparkle & Shine over at The Rubber Cafe


Good morning, I am over at The Rubber Cafe today with my second guest post for the month of November.  You know what that means don't you?  I now have two holiday cards completed on my long long list.  How are things coming along for you?  I must say, when I saw the "Let it Snow" background add-on, I knew I wanted to create something elegant with those snowflakes.  What is more elegant than silver and gray?  I searched my Echo Park paper pad included with the kit and picked out complimentary papers that would hopefully translate to what I had in my head.  So here it is....


I started by collecting what I thought would end up on my card.  But like many you, I changed my mind.  I wanted my emphasis to be on the gray not black so I cut out the ribbon and added just a portion of one of the chalk stickers.


After layering my papers and embossing my background, I applied them together using foam behind the dark gray layer to create dimension.  Below, I show you how I perfectly cut the portion of the sticker I wanted.  I used my trimmer to get the straight line.  I am too haphazard with scissors and could NEVER get the straight result I would want.


Once the sticker was cut, I applied it to scrap white cardstock so it would be a bit more stable and I still wasn't sure where I was going to use it.  With dirty fine tip scissors, I trimmed it out.  


I stamped the image I wanted on the same gray snowflake paper I used in my border.  Trimmed out a square.  I backed this block with foam tape.  First, on the card, I placed down the black sticker, laid down some elegant silver thread to get a whimsical feel, and placed down my saying.  Now time for the bling!  I added the small gems to the small square and randomly placed the large snowflakes on my background.


I hope this card has inspired you to get busy with your Twas the Night - December kit.  Now I have 73 more to go, how about you?

Mary-Ann

Supplies:

Adhesive: The Rubber Cafe'- Scrap Happy GlueKool Tak Foam
Embellishments: Queen & Co. Rhinestones, Chalk Sticker sheet, and Snowflake gems, included in your kit, Silver Thread, Your so Fine Silver Glitter
Tools/Dies: Fine tip scissors, VersaMark Stamp pad, heating tool


November 8, 2013

Dear Pooh

Dear Pooh,

You have made it to my bed more times than I can count.  
Thank you so so much for comforting my son 
for so many years.


This little guy was purchased before my son was born (more than 8 years ago).  We bought him at Target in Pennsylvania.  He has come and gone as a sleeping partner but is definitely the most chosen one.  Next up is Cookie Monster who only goes camping and Ted, a Build-a-Bear that he chooses often too.  But Pooh, he is who comes out when Roman doesn't feel good, when daddy is out of town, or when company leaves.  He is the soothing go-to friend.


This layout was created for the Lifted class I am taking over at Studio Calico.  I collected products from Marks & Co and Double Scoop and threw in a few favorites too.

TFL,
Mary-Ann

November 6, 2013

Why I love my dog....

Why I love my dog.....

She keeps me warm, very similar to a blanket cause she lays on me ALL the time!  She has big ears.  She is just plain beautiful.  She loves my son.  She torments my cat.  When the warning alarm goes off to get my boy after school, she is up and at the door waiting.  She doesn't beg.  Soon as my husband leaves the room to get ready in the morning, she sneaks in and gets in bed with me.  She sleeps as late as I want to.  She just makes me happy.  But most importantly, she is a girl.  So that means, I am not the only female in the house, she and I think she should get a vote! 

Bonus: I get to use pretty scrapbooking embellishments when scrapbooking about her.  
That is what I did here!  Bring on the pink...


Oops, accidentally uploaded the wrong photo:o)  Can't find my delete button!!


See all the pretty girly colors and embellies?  Pink, peach, flowers, doilies oh my!  Tell me she isn't beautiful....  I dare ya!

Mary-Ann

PS:  BTW, I used Studio Calico's Antiquary kit (best one ever!), some mists and sprays, SC Chipboard Shapes, Dear Lizzy Adhesive Backed Flowers, Crate Paper Ephemera and Chipboard, and Amy Tangerine Paper Leaves


November 3, 2013

My First guest post over at The Rubber Cafe


Good morning, I am overly delighted to be sharing my first Christmas card with you over at The Rubber Cafe.  It is made with the ah-mazing TRC November Creative Kit of the Month.  I wanted to keep this card clean and white with a splash of that yummy candy cane stripped paper included in the kit.


After layering papers on my 4 1/2 x 6 1/4 card base, I cut down a 3 1/4 x 4 1/2 piece of the white snowflake paper from the 6x6 paper pad included in the kit.  I utilized the cluster of flakes in the lower right corner.  With a brown marker, I colored only the antlers of the silly deer from "Twas the Night" (stamp set included) and added them to the top left corner.  You will see below where I was going with this.  I was hoping that they would resemble the twigs at the end of the pinecones.....


Knowing that I wanted the long ornament stamp from the same set to resemble a pinecone instead of an ornament, I  dug out my colored pencils and began coloring with browns to get my desired look.  Trimmed them out with my fine tip scissors and backed two of them with thin layers of foam tape.  


Here you can see how I clumped them together, added a bow and a jingle bell.


Using the same technique I used with the antlers, I colored only the word Christmas from the phrase "Have a Holly Jolly Christmas."  If you huff on it a little, it warms it up and stamps rather nicely.  I added this to the lower right, overlapping the excising snowflakes from the paper.  The white on white was too matchy, so I took the same brown marker that I had been stamping with and hand drew, a non-perfect border around the edges.  Backed the entire block with foam to create dimension and a little shadow to help the inner block pop off the background.

Now,  I only have 74 more Christmas cards to go!!  I will be joining TRC again on Monday November 11th with another card, which will take me down to 73!  See you all then.

Mary-Ann

Supplies:
Stamps: The Rubber Cafe' - Creative Cafe Kit of the Month -Twas the Night
Paper: The Rubber Cafe' - Creative Cafe Kit of the Month -Twas the Night
Adhesive: The Rubber Cafe'- Scrap Happy GlueKool Tak Foam
Embellishments: Ribbon, Jingle bell, Queen & Co. Rhinstone, all included in your kit.
Tools/Dies: Fine tip scissors, colored pencils, blender pen, brown marker


November 1, 2013

Twas the Night Kick off over at The Rubber cafe


It's November 1st and do we have a GORGEOUS holiday card kit to share with you filled with beautiful paper and embellishments sure to get your holiday creative juices going! 


This month's kit is just packed with versatile stamps, embellishments, and bling. With that combination, your cards are sure to be the hit of the season.

Don't forget to visit the blog often for featured card tutorials using
our new monthly kits.Here's a closer look at the Creative Cafe Kits
 stamp set includedwith the kit called Twas the Night!


In addition to fabulous papers, embellishments, and a very merry stamp set, 
you'll have the choice of purchasing the following add-ons: 


and 

Don't forget. . . with each kit you'll receive an Inspiration Sheet filled with
project ideas made by our talented Design Team. This sheet gives you
wonderful ideas on how to use the papers and embellishments in the kit.
Be sure to visit the blog often for tutorials by our very talented Design Team!
Here are a few sneak peeks to hold you over: 


Thanks for making our monthly Creative Cafe Kits a success!